 This is my first FL Studio Tutorial on Music Sensation.
The project is called „Another Guy”. It was created by Boy George and Vanilla Ace, and the vocals belong to the singer Katerina Themis.
Here you can listen to the original song:
Everything started with a contest on Beatport.
In this video, Boy George starts the competition.
The prizes and the fact that I liked the song attracted me.
I haven’t won any prizes, but I’ve accumulated a lot of experience. In this FL Studio Tutorial, I will teach you how to remix a song from scratch.
I start with the vocals and I add the instruments around it.
This is an FL Studio Tutorial made for everybody that loves creating music.
I’ve downloaded the acapella, now I’m going to take care of the instruments.
As a bonus, I’ve added the flp of the remixed song.
Besides the flp, I’ve also added a secret bonus. What is it?
You’ll find out only if you download it.
Note: I’ve only used the default FL Studio plug-ins, so you will be able of opening the project, without having to look after any other VSTs.
Step-by-step FL Studio Tutorial:
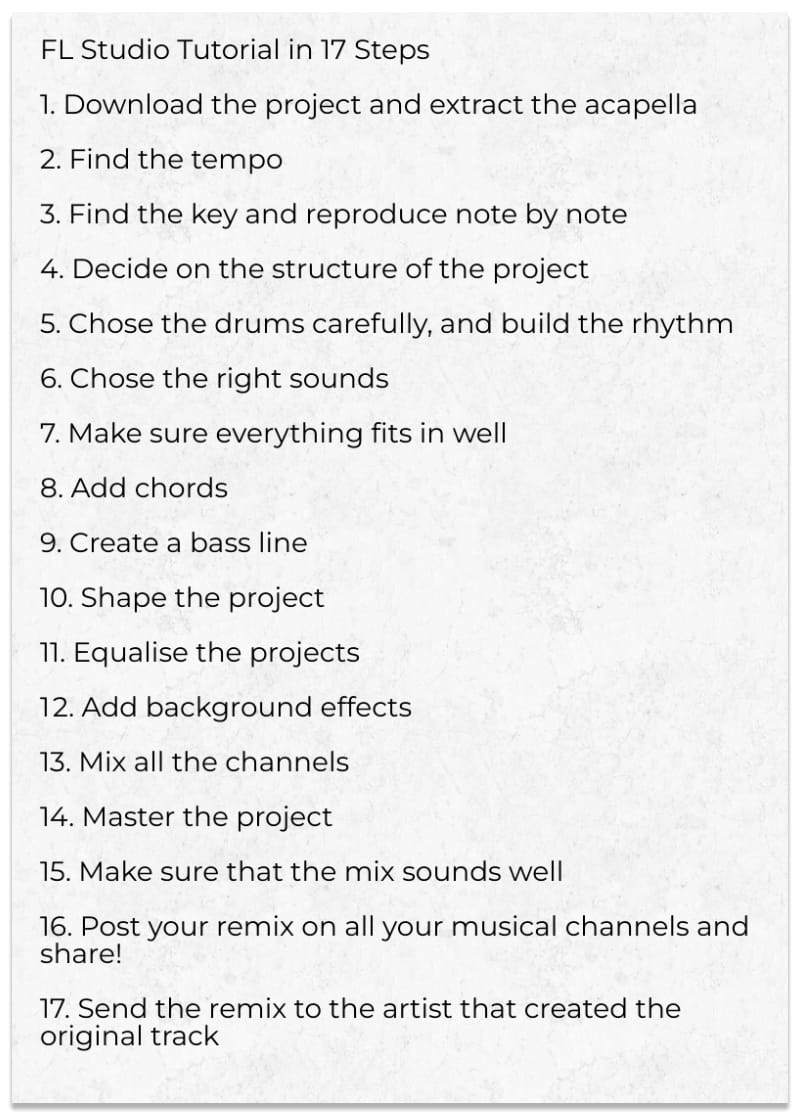
1. In order to start this FL Studio tutorial, we need to download the acapella file first
The first thing you have to do is to download the package. Usually, you have to unzip it.
In the package, you will find the acapella. Import this acapella in FL Studio. You can do this by inserting a sampler:
Here is how the spectrum of the voice looks:

Bonus tip: If you want to find the acapella of a certain song, search on Google or YouTube like this: “name of the song” – “studio acapella”.
In case you did not manage to find it, you could ask the artist for it.
2. Find the tempo of the acapella
This is one of the easy things. Most of the time you will find the tempo by just reading the information attached to the file. In my case it was simple.
The tempo was specified on the site. There are cases in which the tempo is not specified though.
You need to know the tempo of the acapella, otherwise, everything will be out of sync.
Here is one of my favourite methods:
Import the acapella in Virtual DJ. In the upper right, you will see the tempo.

(how to find the tempo in Virtual DJ)
To make sure, you can import the original song into Virtual DJ. This way you will be sure that this is the correct tempo.
There are other ways of finding the tempo though.
Insert a sampler in FL Studio. Import the acapella in that sampler.
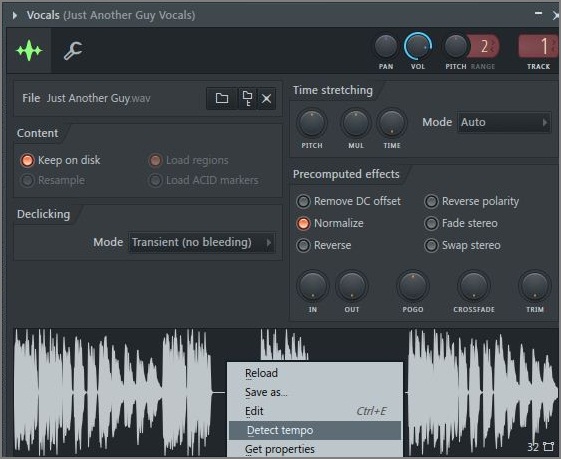
(How to find the tempo in FL Studio)
Left-click on the sample’s spectrum and select detect tempo.
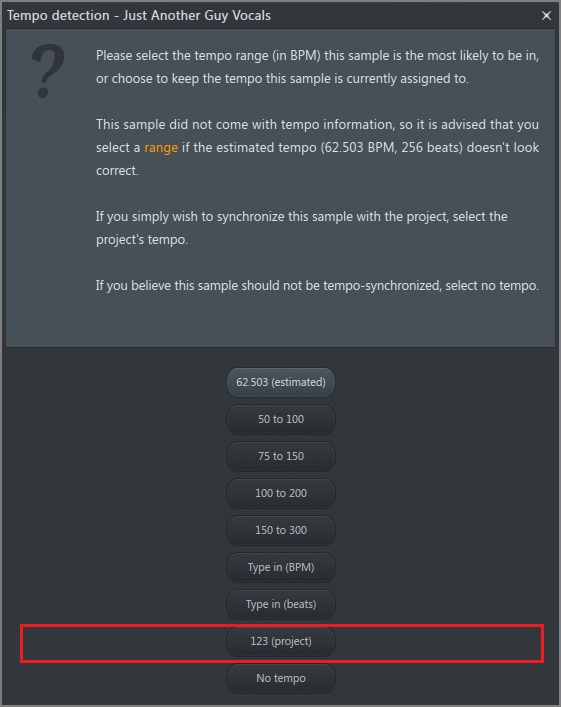
As you can see in the image, it already shows you the tempo.
Now, set the tempo like in the following image.
![]()
![]()
![]()
3. Find the key and reproduce note by note
In the basic info of the remix, you will also find the key. If you want to work on the project you need more information.
You need to reproduce the acapella note by note, to know what notes it contains.
Afterwards, you will choose some chords that fit with the voice. You will build the entire song around the voice.
It’s not as hard as it seems. You can find the key by using a pitch plug-in, like NewTone, Melodyne Celemony, or Autotune.
Now you have a pitch plug-in. How do you use it to find the notes of the voice?
Most of the time I prefer using the default plug-ins so I will use NewTone.
NewTone has the capacity of manipulating the height of any sound.
It also has another feature. You can export in the piano-roll all the notes.
This is my favourite method of finding the notes in the voice.
This is a great method of decrypting any acapella. I will explain how to do it step by step:
• Insert NewTone on the master channels
• Open the acapella with NewTone
• Set the parameters Center to 0% and Variation to 0%
• Export the notes in the piano roll (there is a special button for this)
• Sync the notes by using a quick quantised start time.
If you did this, you are not done yet. The notes aren’t yet properly placed.
Go to the piano-roll settings, and tools, and choose “Quick quantize start time”.
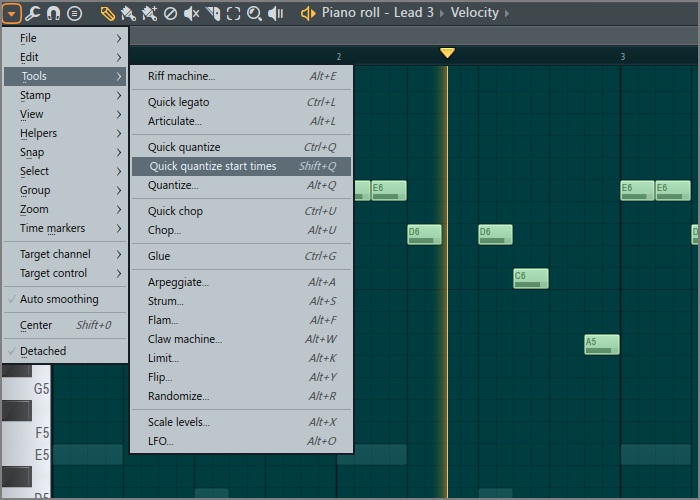
This setting will synchronize the notes.
• Remove all the notes that are out of tune
The voice has pitch variations. NewTone reads those variations and converts them to certain note heights.
This is why out-of-tune sections appear. There is a solution to this problem.
Here is how you can solve it:
Remove all the notes that are not in the same key.
If you are working in A minor, then remove all the notes with #.
Go to the piano roll and select from the left the entire La# and press delete. Make sure that you are deleting just what you really want to delete.
This way you will remove all the unwanted notes.
I had a big problem when working with the voice. Fortunately, I learned that method.
• Normalize the sound levels
The voice has natural pitch variations, but there is another problem.

The human voice also has volume variations.
When you export those notes from NewTone to piano-roll those volume variations will also be present.
In the piano roll, the notes will have various volume levels.
Bring all the notes at the same volume, by dragging them with the mouse.

• Overlap the acapella with the found notes.
Congratulations, you’re almost done. There are still some problems regarding the length of the notes, but you can solve them easily.
NewTone will help you a lot, but it won’t do all the work.
There will still be elements that won’t sound right. This is why you need to overlap the acapella with the found notes.
It’s just for checking purposes. In my case, things were simple.
The melodic line is made of a small number of elements, so the process was simple and fast.
Bonus tip: don’t overuse pitch correction tools. Keep the voice as natural as possible. If you exaggerate, you can make the voice sound somewhat robotic.
4. Decide on the structure of the project
You need to have a plan from the start.
You can even use the original song’s structure if you want to. Or you can change the order or completely replace certain elements by taste.
I’ve rearranged the whole project and left some free places for the main instrument.
As I’ve said earlier, I always add the instruments so that they fit in with the voice, this is why I rearranged the acapella.
5. Chose the drums carefully, and build the rhythm
One of the many pieces of advice that I’ve received was to start the project with rhythm.
The one that gave me this advice was partially right.
You need to consider the rhythm when starting a song, so taking care of this should be one of the first things you take care of.
If you know me well, most likely you know that I use sampling (for the drums). I’ve used the following drums for my project:
• Kick Premium 5
• Clap Deluxe
• Hat Premium Gold 17
• Hat Premium Gold 25
• Bongo 8
• Conga 13
• Hat Premium Gold 16
• Percussion 8
• Click Premium 2
I’ve chosen 9 drums to reproduce the rhythm. Let’s move on to the next step. Building a proper rhythm.
The rhythm needs to fit with the song.
I use rhythm variations in my projects. What do these variations represent?
In some moments, the song has more elements, while in others it has fewer. I’ve used 4 rhythm variations. I recommend you use at least 3 in your projects.
This technique gives much dynamism to your project.
A song that has the same drum kicking 100 times will be boring.
I’m sure you’ve encountered such projects. I’ve seen an FL Studio Tutorial having the same rhythm from beginning to end.
The entire project had the same drum combination.
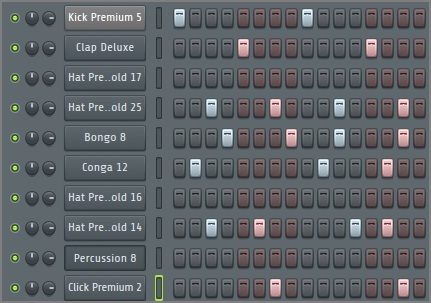
Music needs to be dynamic. It needs variation. This is the only way to make your projects feel more “alive”.
6. Chose the right sounds
The most important thing is the context. When you are picking the sound, respect the context.
The sounds need to be in perfect harmony.
All the elements need to fit in like pieces of a puzzle. It’s hard to find sounds that fit in.
A trick that you might use when choosing is to pick sounds so that they occupy their own band of frequencies.
I’ve used 8 presets for this project:
• PLC Easy Melancholy
• LED Call Angels
• PAD Alive Spirit
• Main Chord Default
• FNS Cold Weather
• Main Chord Default – Sinusoidala 2
• BAS Tribal
• SFX Rise Up
These sounds were 100% created by me.
I prefer to work only with my own sounds because I’m very picky. It’s hard for me to work with others’ sounds.
This is my personal preference.
I’ve explained in a previous article the behaviour of a sound hunter. A sound hunter has 3 methods of obtaining sounds.
It’s important to pay attention to these sounds. Depending on what you are using, you will get a different outcome.
I wanted a more melodic result (more harmony). The original seemed somewhat dull. This is why I wanted to add a bit of colour.
I’ve always enjoyed that rich, powerful, but balanced sound.
This is why I’ve chosen some epic sounds. There is an alternative to getting such sounds.
You can create your own sounds, but this takes time, but in my opinion, it is a good alternative.
Sometimes, finding the right sounds by searching might prove very hard.
7. Make sure everything fits in well

Now you know the notes of the acapella. I’ve shown you earlier how to find them.
The next step is to make sure the voice is in harmony with the other elements.
You should take care of the melodic line now. It has to be in harmony. All the chords used depend on this melodic line.
Chose a pad, and add supporting harmony to every note of the acapella.
This way you will be certain that your entire project contains harmony.
I use this trick when I’m “harmonising” my projects. I’m talking about the ghost channel that you can find on the piano roll.
Activate this setting. You will know the position of any note inserted in the same pattern.
From the upper left, click on the arrow, go to Helpers then select “Ghost Channels”.
8. Add chords
The pad is the background harmony. You also need a foreground one.
Add chords.
I usually put these chords on certain steps.
You need intensity variations in your own project. A variation of energy between the harder parts and the softer ones.
9. Create a bass line
I‘ve already picked the preset for the bass line.
It’s time to take care of the lower frequencies. The bass can be made out of multiple instruments, or you can simply use one instrument (like I did in this case).
Another alternative is to use 3 or 4 sinusoids. You might be wondering how you mix this bass:
• make sure that the bass is on mono (no panning, detuned or other chorus effects
• don’t use strange phaser effects on the bass (I recommend using a little distortion to some degree, but not too much, and just in some situations)
• don’t add delay to the bass
The bass should be powerful and it should give a certain energy to the project.
10. Shape the project
Be organised!
This is how to organise a project in FL Studio. I always make a connection between the pattern, mixer and playlist.
Here are some useful tips:
• remove everything that you are not using
How to find out what instruments did you use? Press CTRL+F8.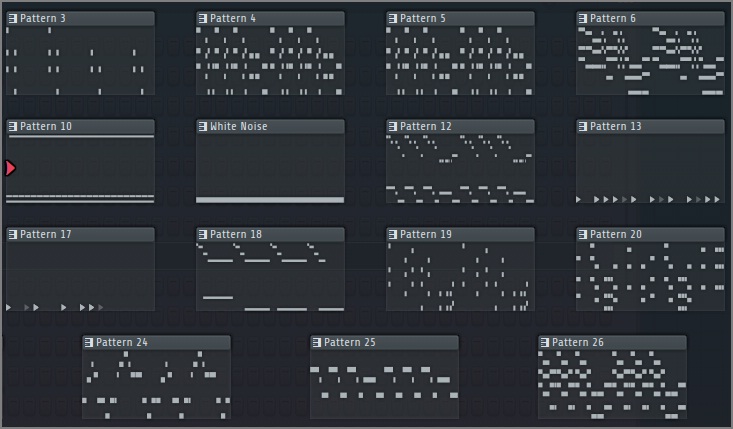
All the elements that you’ve used in the song will appear.
These elements are:
• all the sounds, including audio samples that you’ve used
• all the patterns that have notes
In order to improve your efficiency you could:
• delete all the patterns that are not in the playlist (that you are not using)
• rename each channel in the pattern, the mixer and in the playlist
• optionally, you could add a custom icon to each channel in the mixer and playlist
• also, you could set different colours for each channel
If you don’t have time, then don’t change their colours, but remember that a coloured project will look better.
I had a bad habit of inserting many sounds.
I realised that if I’m not organised I won’t be that efficient.
Add delay/reverb effects.
The acapella that I downloaded already had a delay, so I just needed to add some reverb.
11. Equalise the projects
Equalising is based on certain principles.
I’ve chosen to take care of the voice. I want to highlight it.
A good equalise can make a spectacular difference.
Here is how I’ve equalised the voice:

12. Add background effects.
Background sounds to create a lot of atmosphere.
The whole design of a song depends on picking the sounds, so background sounds need to be chosen wisely.
The primary background sounds are:
• white noise
• SFX
• atoms
• rise-up
White noise is very important and it should be used in any musical project.
You get the point, but how do you create it? I use a very simple, default VST from FL Studio: 3 OSC.
With 3osc you can generate this white noise. Afterwards, you just need to insert a note in the piano roll and then print it in the playlist.
This method is easier to apply because you don’t need to use samples.
If you want, you could use white noise samples though, but it’s much more complicated.
These white noise samples will occupy a lot of extra memory. Furthermore, if you move their location, after you open the project they can’t be imported.
This white noise should be mixed at a low volume. I usually use another tool.
I’m talking about Effector. Another free plugin from FL Studio.
I use this plugin to add a phaser effect on the white noise. Most music producers use LP and HP filters.
Here are the effects that I’ve used in this project:
• white noise
• FX Shut it Down (for the intro and ending)
13. Mix all the channels
The next step is to mix. Make sure that all your elements are at the right level. Tip: don’t change parameters from the pattern. That includes the volume.
You will just make things harder to manage. Make sure you’ve inserted all the channels in the mixer.

This is one of the mistakes that I’ve been doing at the beginning. Another important thing is to clean each channel. Remove the frequencies that are useless.
Take each and every sound and remove the unnecessary frequencies.
In my case, I’ve removed some of the frequencies of the main sound.
These frequencies must be removed because there are already other instruments covering that area.
13. Master the project
You will be surprised, but I haven’t used compression at all.
I’ve just passed the song through a few presets from iZotope Ozone 4. I’ve just made a few tests out of curiosity.
I never compress my own musical projects. There are sound engineers and producers that mix without compression.
By using too much compression you can get awful results. I personally hate hyper-compression.
After I’ve been done mastering, I recorded with Edison then I analysed the spectrum.
As you can see, it’s not 100% saturated.
I hate this tendency of bringing the whole track to the same level.
If you want to analyse the spectrum you could use Academo. Academo is an online spectrum analyser.
I’ve saved the mp3 and I’ve imported it into Virtual DJ. The only thing that was left was to record. I use Virtual DJ to normalise the track volume

15. Make sure that the mix sounds well
Did you believe that I was done?
I still have something to tell you in this FL Studio tutorial.
Important tip: don’t rush it! This is one of the biggest mistakes you could ever do. Posting something that it’s not completely done.
Test your mix and verify if it actually sounds good.
Here are a few ways of testing:
• sent to your friends to listen
• listening to different audio systems
• converting the mix to mono (stereo might deceive you)
• listening to your track on professional sound systems
By listening to such sound systems you can hear each and every flaw of your mix.
Does your mix sound good on a professional sound system? If yes, then congratulations, you did excellent work!
16. Post your remix on all your musical channels and share!
 Your project is done, and you’re 100% convinced that it sounds good.
Because it’s a remix (the original track is not mine) we need to be careful with copyright. In my case, I was unable of uploading the song on YouTube without getting warnings.
You can contact the producer if in doubt. Most of them accept remixes.
Why?
Because they are receiving free publicity, and this helps them a lot.
A song with many remixes is usually very popular.
You’ve got the license to post? Very good, you’ve made an awesome track. It’s time to post the project.
Here is where I’ve posted it:
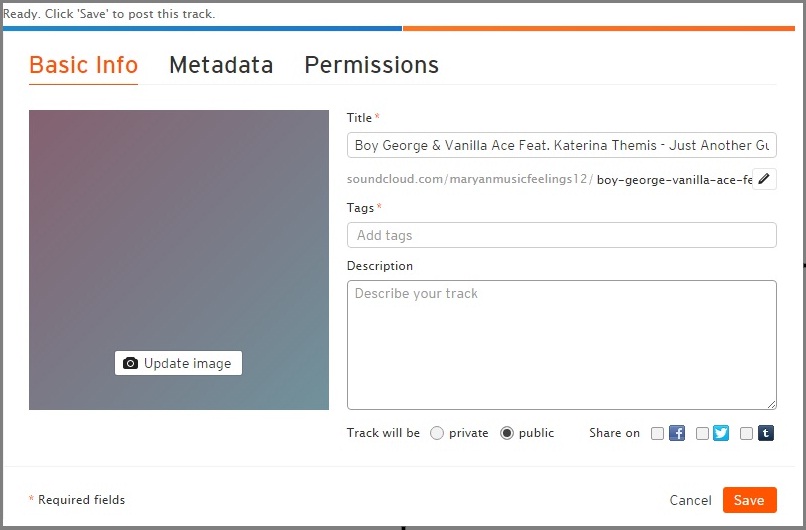
I’ve uploaded it to SoundCloud and YouTube, and also on Beatport.
YouTube:
SoundCloud:
Post the remix on all the channels that you are active on (YouTube, SoundCloud, Beatport, My Space, MixCloud, Sutros, MyListen, etc)
Your remix is on the internet now. What’s left is to promote it.
If you are curious about how long did it take me, then I will tell you.
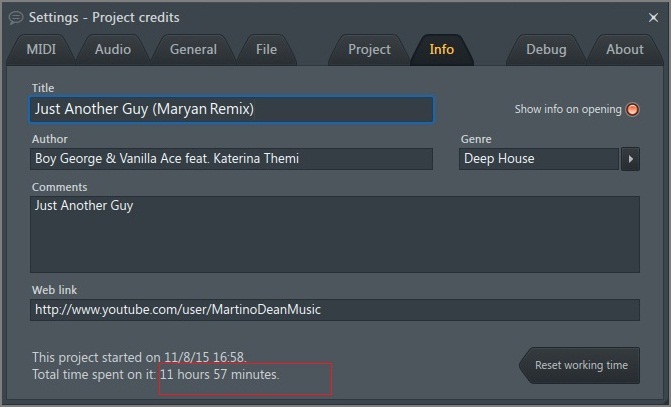
It took me 11 hours and 57 minutes.
17. Send this FL Studio tutorial to the artist that created the original track
If you are sure that your remix is really good there is something else that you could do.
It can help you gain a reputation.
Send the remix to the original artist. If he likes it then you can consider yourself lucky.
He might promote you, or you might get tips from a professional.
You can try this, you have nothing to lose.
Did this FL Studio tutorial help you?
I thought that it might be useful to present my work in an FL Studio tutorial.
This is why I’ve told you all the steps that I took.
Here is another purpose of my work.
I’ve participated in a contest with this remix. Unfortunately, I’ve got only 6 votes.

Even though I haven’t won any prize, the simple fact that I participated matters.
I’ve learned many things. I told you everything that I know in this FL Studio tutorial.
I got only 133 shares on Facebook.
Here are the comments that I’ve got (pretty good ones if you ask me):

Maybe you can give me some promotion tips.
This is an area in which I don’t have much experience.
I wasn’t the only one that hasn’t won anything. A friend of mine was in the same situation. He remixed another project.
Just Another Guy is my first remix with voice (acapella). I will try more projects like this.
Here is the grand prize of this contest:

The big price sounds very tempting, and even though I haven’t won it, I’ve accumulated some experience.
I’m ready to win it the next time.
I’m hoping that these prizes will convince you to join the contest. This is another good reason to keep working.
Here are some remixes of this project:
Here is the remix that won the competition:

[BOY GEORGE & VANILLA ACE FEAT. KATERINA THEMIS – JUST ANOTHER GUY (MOONCUT & SOULTONIQUE REMIX)]
I’ve made available a free flp. I’ve also added a secret bonus for you.
You will find out what it is only if you download the material.
How do you think you can win a remix contest? I’m looking forward to your opinion.
Tell me if you did enjoy this FL Studio tutorial
I believe that I did pretty well considering that it was my first attempt.
 Click Here to Download Free FLP and Secret Gift
In this file, you will find everything that I’ve taught you in this FL Studio tutorial.
You don’t have to do anything for this flp.
You don’t even have to give me the e-mail address. The download is safe and 100% free.
There is just one single click required.
Leave me please comment in the section below. Please tell me what you think about this FL Studio tutorial.
Do you know any way I could improve my methods?
I’m looking forward to your comments.
Good luck!